
It’s that time of year again to start thinking about starting your seeds indoors. It’s a great way to get a jump on spring. For the last few years I have been using soil blocks to start my seedlings. They are a great alternative to those plastic seed starting cells. There is a small initial investment in purchasing the soil block molds, but once that’s complete your done. Unlike the plastic cells you need to buy every few years.
If you are considering using soil blocks to start your seeds, there are a few things you’ll need:
- Soil block makers: I suggest purchasing a 3/4″, 1-1/2″, and 2″ block molds
- Seed starting soil: see the recipe below
- Trays: Any seed starting tray will do. I prefer to use photo developing trays, they are thicker and have channels on the bottom. I also use old cake pans, for smaller blocks.
- Hardware cloth (wire mesh): 1/4″ or 1/2″ grid, cut to fit in the bottom of the tray.

Soil blocks are created by molding soil into a particular size cube. There are several size soil block molds available on the market today. I own a 3/4″, 1-1/2″, and 2″ mold. The 2″ mold has inserts that can be installed to create an opening in the block to receive a 3/4″ block. This allows you to block up as the plants begin to grow. The block size is often determined by the seed size, I use a 3/4″ block for lettuce, flowers, broccoli, and tomatoes (just to name a few), but a 1-1/2″ block for squash seeds. The 2″ blocks are great for blocking up from a 3/4″ block.
The most important part of the soil blocks is the soil. There are several suppliers of seed starting soil suitable for soil blocks. I have chosen to make my own seed starting soil for my soil blocks. I have found a wide selection of recipes available online. After trying a few, I have chosen the one below. Note: Several of the recipes call for perlite, but I found that using the perlite with the 3/4″ block mold can be problematic. The large pieces of perlite do not allow the soil to pack well in the 3/4″ mold.
This recipe will make a small batch of seed starting soil:
– 3 quarts peat moss
– 3 quarts fine compost
– I quart vermiculite
– 2 Tablespoons blood meal
– 2 Tablespoons bone meal
– 2 Tablespoons jersey green sand
First I mix the peat moss with the blood meal, bone meal and jersey green sand. Then I add the vermiculite, once everything is thoroughly mixed I add the compost and continue mixing. I place the soil in a storage container and only scoop out small batches at a time to moisten with water, thus keeping the remainder of the soil from molding until I’m ready to use it. When I’m ready to make blocks, I wet the soil until it has a consistency of cooked oatmeal.
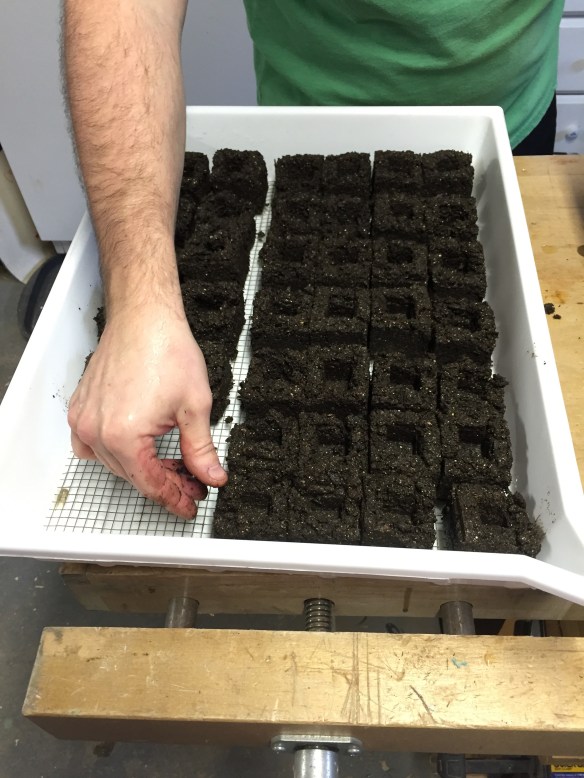
Now you are ready to start molding soil blocks. I make a mound of soil and press the mold down into the mound several times until the mold is well packed. Then I place the soil blocks on a piece of hardware cloth in a plastic seed starting tray. The hardware cloth allows the blocks to sit level, since there are channels in the bottom of the tray. It will also allow the water to run in the channel when watering the blocks.
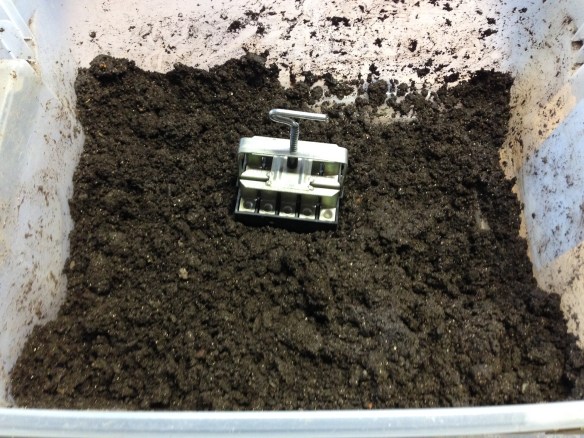
Soil mix, 3/4″ block mold

3/4″ block mold, filled

Standard seed starting tray with hardware cloth (wire mesh)
Once the soil blocks are created, I place one seed in each divet created by the soil block mold. I then cover each seed with a small amount of vermiculite (if using the 3/4″ blocks) and then spray each block with some water. I cover the seeds in the large blocks with more seed starting soil, instead of the vermiculite used on the smaller blocks.
I then place the tray of soil blocks on my growing stand (with grow lights). Depending on the time of year, or the type of seed, I may place the tray on a heating mat as well. Heating mats can be purchased at any seed starting supplier. Because the soil mixture is wet when you make the blocks, there is no need to water for the first 24 hours (unless you have the tray on a heating mat).
One of the biggest challenges with making the switch to soil blocks is watering. If you apply to much water directly to the block, they will start to break down. I find it is best to spray the block with water until the seeds germinate. Then, I water the blocks by pouring water into the bottom of the tray. Since the blocks are sitting on the hardware cloth they are just off the bottom of the tray enough to allow water to run under the blocks. I only place enough water in the tray to come up to the top of the hardware cloth. The water is then wicked up into the blocks to keep them moist. One important point is that you do not want the soil blocks to dry out. I check the moisture of the blocks by touching the sides of the soil block to see if they are moist.
I have found that if I am using a heat mat I need to water more frequently. The additional heat can really dry out the soil blocks quickly.
2″ blocks in photo developing tray with hardware cloth under the blocks
If you plan on starting seeds in the 3/4″ blocks, you should also plan on blocking them up to a 2″ block two weeks after they have germinated. I have had problems trying to grow seeds in 3/4″ blocks for a long period of time (6 weeks +), the plants grow ok, but then they become stressed and do not transplant well. Its best to transplant the seedlings before they get too big.

3/4″ blocks with seedlings, ready to transplant
When transplanting the 3/4″ blocks into the 2″ blocks, I place a small amount of the wet soil mixture on top of the 3/4″ block (around the seedling). This helps cover and protect the base of the seedling. Once they are blocked up to the larger blocks, I place the tray back under the lights.

Transplanting 3/4″ blocks into 2″ blocks
After a few more weeks under the grow lights, the seedlings will be ready to start moving outdoors in preparation for planting in the garden.
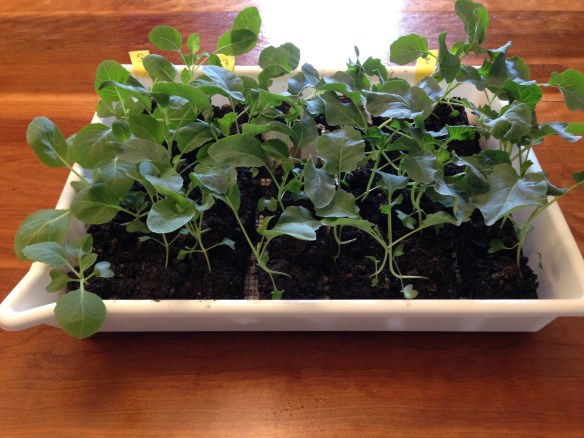
The seedlings after a few weeks
Here are several links for additional information on using soil blocks:
Johnny Selected Seeds
Eliot Coleman’s Soil Block Mix Recipe Video
I feel one of the most rewarding aspects of gardening is starting my own seeds indoors, so if you have not tried it yet, give it a try.
Happy growing…..


These are interesting. I haven’t seen these before. I’ve thought about getting one of these: http://www.greenhousesensation.co.uk/paper-potter-large.html They may be of interest to you?
I made a newspaper pot maker, several years ago. I used them for a few years. You have to be very careful with the newspaper pots, the paper tends to wick the water from the soil, which means the plant gets less water. You really need to keep your eye on the moisture level of the soil.
Thanks. Yes paper does tend to do that, hence I guess why it’s great for drying shoes! I haven’t tried them but they look kinda neat 🙂